http://www.vtgroup.com/
http://www.softwarepassion.com/android-series-custom-listview-items-and-adapters/
http://stackoverflow.com/questions/2961275/android-mapview-contained-within-a-listview
Java Keytool is a key and certificate management utility. It allows users to manage their own public/private key pairs and certificates. It also allows users to cache certificates. Java Keytool stores the keys and certificates in what is called a keystore. By default the Java keystore is implemented as a file. It protects private keys with a password. A Keytool keystore contains the private key and any certificates necessary to complete a chain of trust and establish the trustworthiness of the primary certificate.
Each certificate in a Java keystore is associated with a unique alias. When creating a Java keystore you will first create the .jks file that will initially only contain the private key. You will then generate a CSR and have a certificate generated from it. Then you will import the certificate to the keystore including any root certificates. Java Keytool also several other functions that allow you to view the details of a certificate or list the certificates contained in a keystore or export a certificate.
Note: For easier management of your Java Keystores (using a GUI) check out Portecle. If you need to buy a certificate, try to compare SSL with our SSL Wizard.
1) Go to Command prompt
2) Generate MD5 Key using java keytool.
3) Fill the information for the key.
4) Get the md5 key.
5) Register it with google.
6) Get the API Key from The google.
7) Use the API key in your application
1) In windows start command promt :
press “ Widow key + r” run diaolg will apear
type cmd and press enter
OR
Press widows key then in search bar type cmd select command prompt from the list.
Then change directory to jdk/bin
e.g c:/…./java/jdk.16/bin
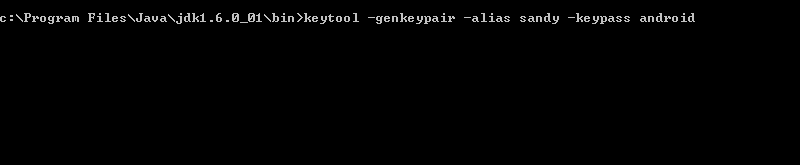
2) Enter the following command…
keytool –genkeypair -alias (alias_name) -keypass (password)
e.g. keytool -genkeypair -alias andy -keypass android

3) Fill the information form.

After running the above command you will find .keystore file generated at your home folder
C:\Users\…\.keystore
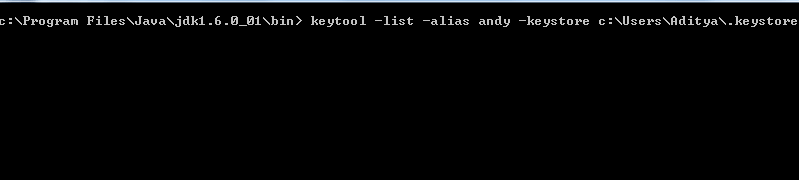
4) Run the following command to get Certificate fingerprint (MD5):
keytool -list -alias -keystore .keystore
e.g. keytool -list -alias andy -keystore c:\Users\..\.keystore


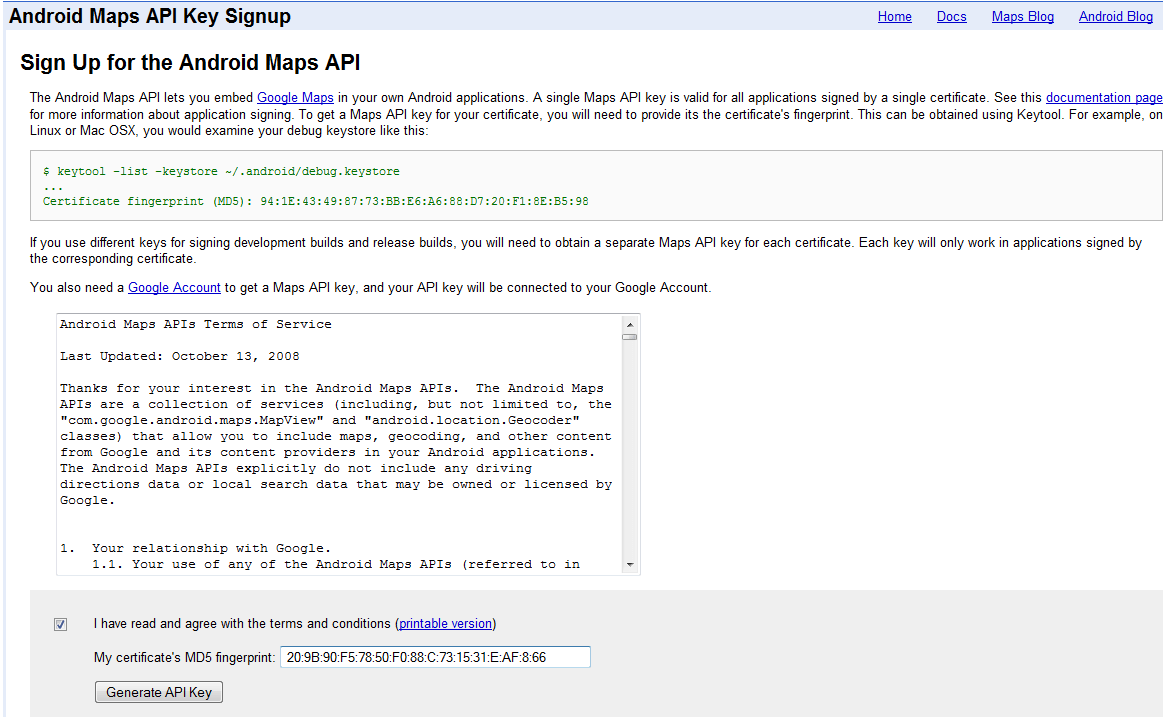
5) After getting the key, register the key with google, on the following link
http://code.google.com/android/maps-api-signup.html

6) Follow the steps and you will get the API key.

7) Use that key in your android/iPhone application.

For detailed use of key tool go to following link
http://java.sun.com/j2se/1.4.2/docs/tooldocs/windows/keytool.html
Now a days social networking websites like Twitter& are becoming very popular,
so integrating Twitter with app has become a necessity to make your application popular.
We are going to do the same through this tutorial. The Twitter Connect SDK provides
code which third-party developers can embed into their applications to connect to their
Twitter accounts and exchange information with Android apps. It’s a way of embedding
“social context” to an Android app, according to Twitter.
Create a Viewbased Application with name ‘Twitter Android Prj’.
http://www.winterwell.com/software/jtwitter.php
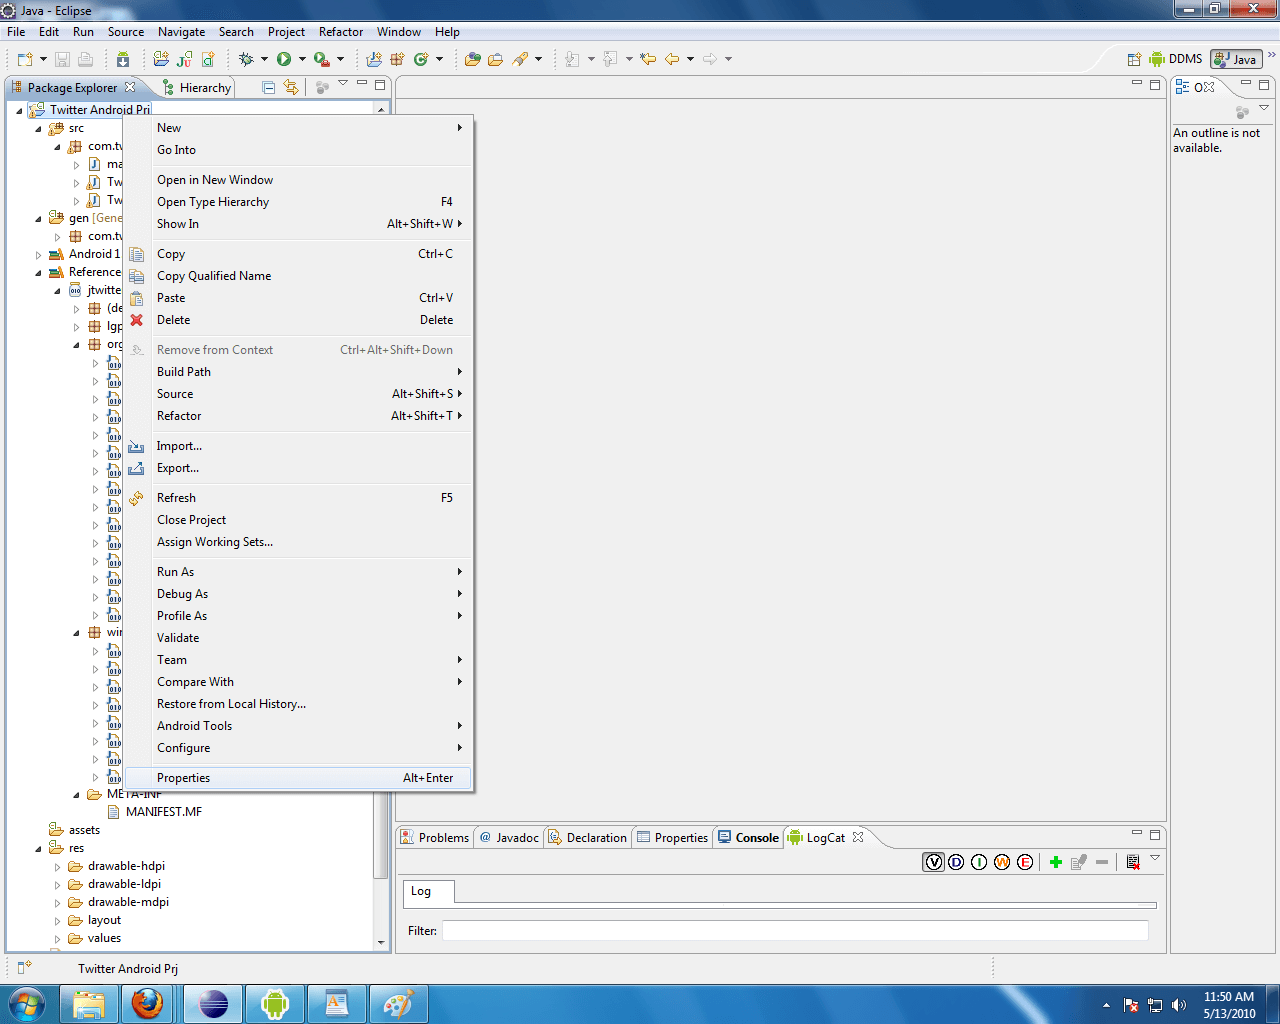
1.1 First you have to set up new Android project .
1.2 We have to add all JARs and Library files.
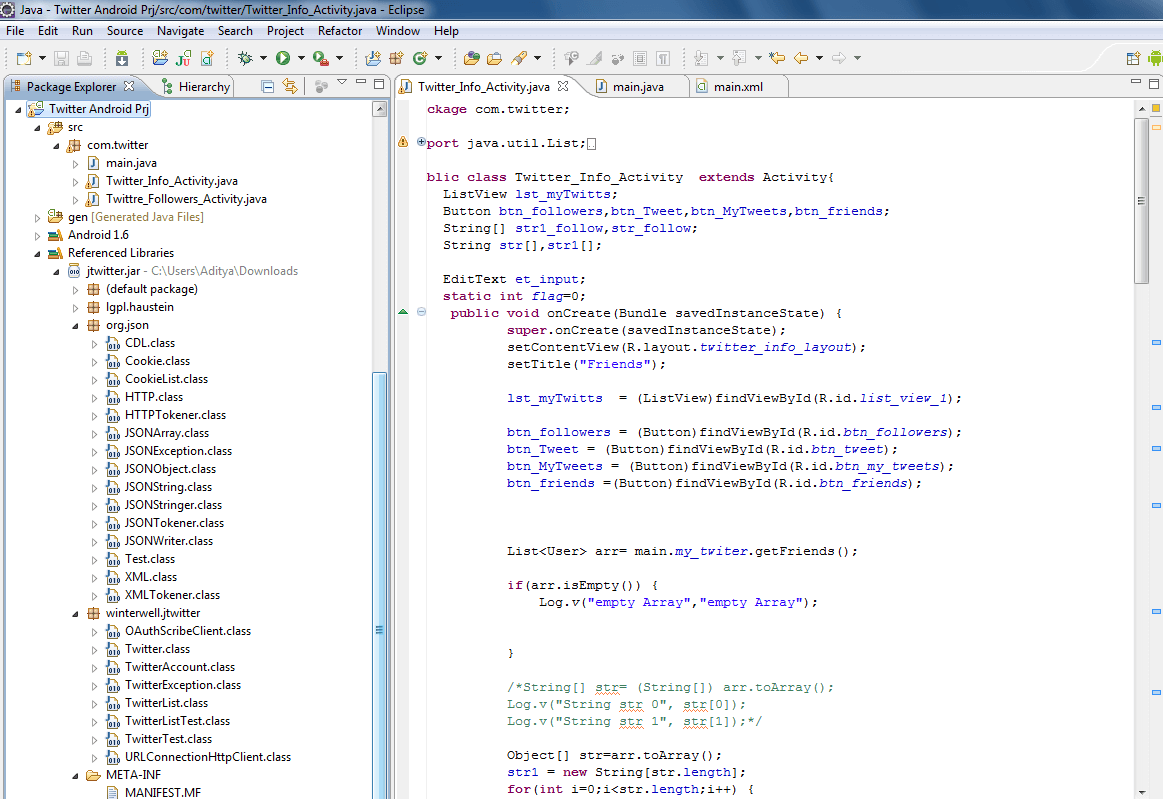
1.3 Import all files in the destination group folder.
1.4 To test import all JAR and library in case any miss.And compile.
2) Create your twitter Acoount.
3) Now Save project (Command +S). Build and Run Project.
4) enter user name and password & Click on Log In Button.
5) Initailly you will see the friends List.
6) Click on Twit button and you can post new tweets in input dialog click ok to post .
7) Click on Followers button and you eill see the list of followers.
8 ) Click on Favorites button and you eill see the list of favorite tweets.
1.1 We have to add all JARs and Library files as below

 1.2 Import all files destination group folder. It should also look as shown below
 Append Following code in .xml file for UI Design
<;?xml version="1.0" encoding="utf-8"?>
<ImageView
android:layout_width="fill_parent"
android:layout_height="wrap_content"
android:src="@drawable/logo1"
android:layout_gravity="center_horizontal"
android:layout_marginLeft="0dip"
android:layout_marginTop="20dip"
/>
<!– Code For Login Name And Password –>
<FrameLayout
android:layout_width="fill_parent"
android:layout_height="wrap_content"
android:background="#fff"
android:layout_marginTop="70dip">
<TableLayout
android:layout_width="fill_parent"
android:layout_height="wrap_content"
android:layout_gravity="center_vertical"
android:gravity="center_horizontal" >
<TableRow
android:layout_width="fill_parent"
android:layout_height="wrap_content">
<TextView
android:layout_width="fill_parent"
android:layout_height="wrap_content"
android:text="User Name"
android:layout_marginLeft="40dip"
android:textColor="#000"
/>
<EditText
android:layout_width="150dip"
android:layout_height="wrap_content"
android:layout_marginLeft="40dip"
android:singleLine="true"
android:id="@+id/main_username_edit_text"
/>
</TableRow>
<TableRow
android:layout_width="fill_parent"
android:layout_height="wrap_content">
<TextView
android:layout_width="fill_parent"
android:layout_height="wrap_content"
android:text="Password"
android:layout_marginLeft="40dip"
android:textColor="#000"
/>
<EditText
android:layout_width="150dip"
android:layout_height="wrap_content"
android:layout_marginLeft="40dip"
android:password="true"
android:singleLine="true"
android:id="@+id/main_password_edit_text"
/>
</TableRow>
</TableLayout>
</FrameLayout>
<Button
android:layout_width="70dip"
android:layout_height="wrap_content"
android:text="Log In"
android:id="@+id/main_loin_button"
android:layout_marginTop="20dip"
android:layout_marginLeft="130dip"
/>
<!– Code For Login Name And Password Ends –>
</LinearLayout>
[/java]
Code Description :
Login:
Tweet Button Click :
Friends Button Click :
Followers Button Click :
Favorite Button Click :
Now Save project (Command +S). Build and Run Project.
Simulator will look like as follows
1) Login Screen : enter your twitter user name and password
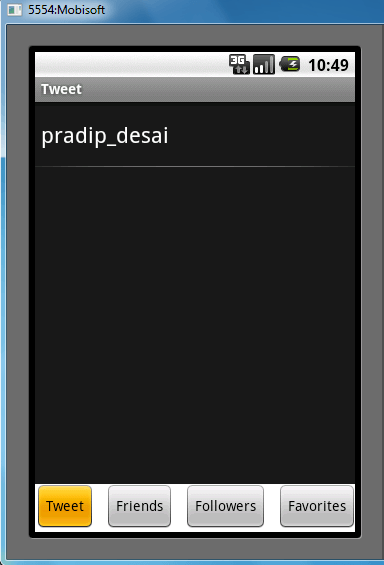
 2) Friends Screen : shows your friends list.
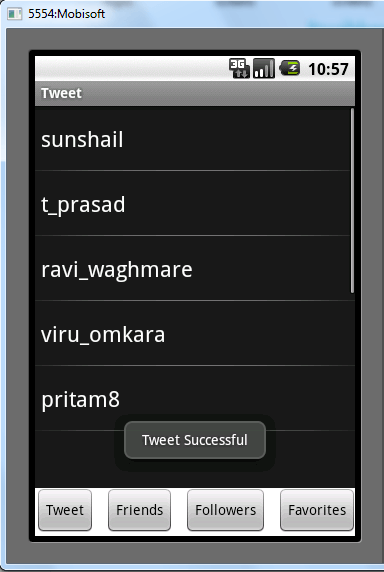
 3) Tweet : Click on Tweet Button
 Input Dialog will appear
 Enter The Text in the dialogBox and click on Ok.
 it will show the message the tweet is successful.

http://www.softwarepassion.com/android-series-custom-listview-items-and-adapters/
http://stackoverflow.com/questions/2961275/android-mapview-contained-within-a-listview
Android MapView Generate API key Using JAVA Keytool
May 27th
1 comment
What is keytool ?
Java Keytool is a key and certificate management utility. It allows users to manage their own public/private key pairs and certificates. It also allows users to cache certificates. Java Keytool stores the keys and certificates in what is called a keystore. By default the Java keystore is implemented as a file. It protects private keys with a password. A Keytool keystore contains the private key and any certificates necessary to complete a chain of trust and establish the trustworthiness of the primary certificate.
Each certificate in a Java keystore is associated with a unique alias. When creating a Java keystore you will first create the .jks file that will initially only contain the private key. You will then generate a CSR and have a certificate generated from it. Then you will import the certificate to the keystore including any root certificates. Java Keytool also several other functions that allow you to view the details of a certificate or list the certificates contained in a keystore or export a certificate.
Note: For easier management of your Java Keystores (using a GUI) check out Portecle. If you need to buy a certificate, try to compare SSL with our SSL Wizard.
Steps to be followed
1) Go to Command prompt
2) Generate MD5 Key using java keytool.
3) Fill the information for the key.
4) Get the md5 key.
5) Register it with google.
6) Get the API Key from The google.
7) Use the API key in your application
Description
1) In windows start command promt :
press “ Widow key + r” run diaolg will apear
type cmd and press enter
OR
Press widows key then in search bar type cmd select command prompt from the list.
Then change directory to jdk/bin
e.g c:/…./java/jdk.16/bin
2) Enter the following command…
keytool –genkeypair -alias (alias_name) -keypass (password)
e.g. keytool -genkeypair -alias andy -keypass android
3) Fill the information form.
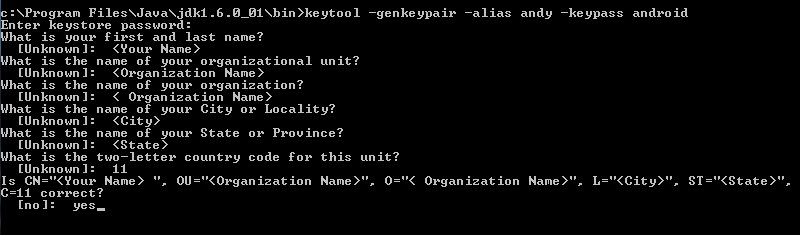
After running the above command you will find .keystore file generated at your home folder
C:\Users\…\.keystore
4) Run the following command to get Certificate fingerprint (MD5):
keytool -list -alias -keystore .keystore
e.g. keytool -list -alias andy -keystore c:\Users\..\.keystore

5) After getting the key, register the key with google, on the following link
http://code.google.com/android/maps-api-signup.html
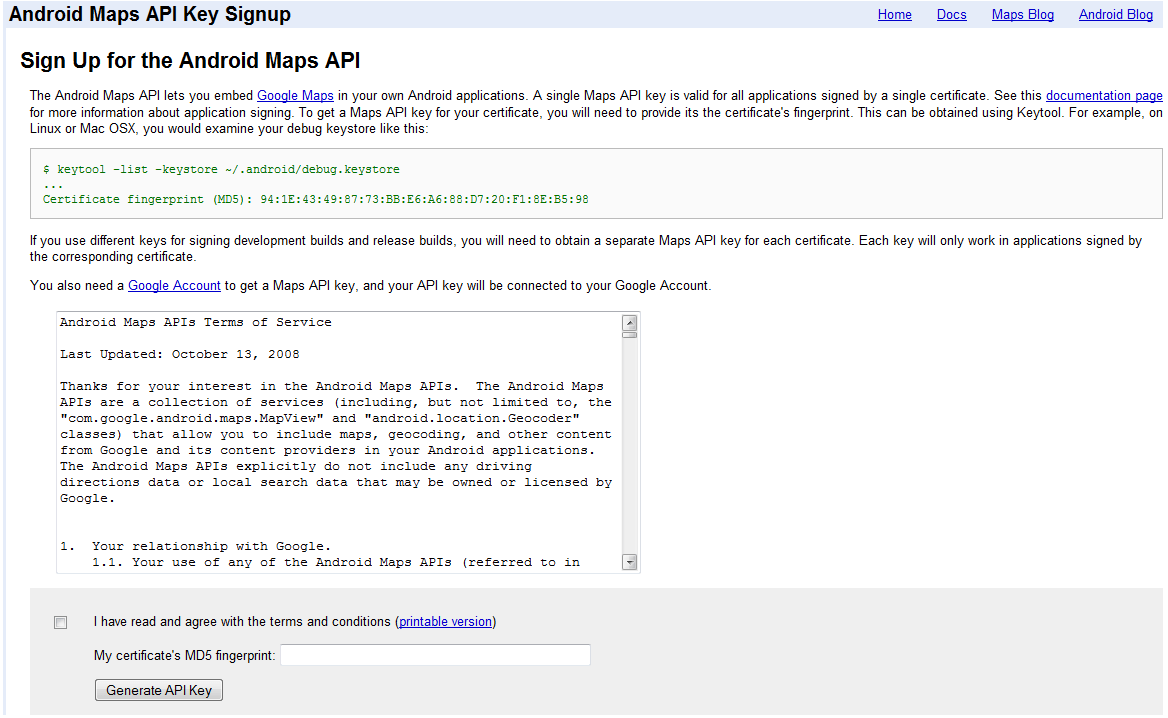
6) Follow the steps and you will get the API key.
7) Use that key in your android/iPhone application.

For detailed use of key tool go to following link
http://java.sun.com/j2se/1.4.2/docs/tooldocs/windows/keytool.html
Android Jtwitter : Twitter Connect Tutorial
May 14th
Now a days social networking websites like Twitter& are becoming very popular,
so integrating Twitter with app has become a necessity to make your application popular.
We are going to do the same through this tutorial. The Twitter Connect SDK provides
code which third-party developers can embed into their applications to connect to their
Twitter accounts and exchange information with Android apps. It’s a way of embedding
“social context” to an Android app, according to Twitter.
Create a Viewbased Application with name ‘Twitter Android Prj’.
Follow the following steps:
1) Download jtwitter.jar for Androidhttp://www.winterwell.com/software/jtwitter.php
2) Create your twitter Acoount.
3) Now Save project (Command +S). Build and Run Project.
4) enter user name and password & Click on Log In Button.
5) Initailly you will see the friends List.
6) Click on Twit button and you can post new tweets in input dialog click ok to post .
7) Click on Followers button and you eill see the list of followers.
8 ) Click on Favorites button and you eill see the list of favorite tweets.
Description :
1) Download jtwitter.jar1.1 We have to add all JARs and Library files as below
add_jar1
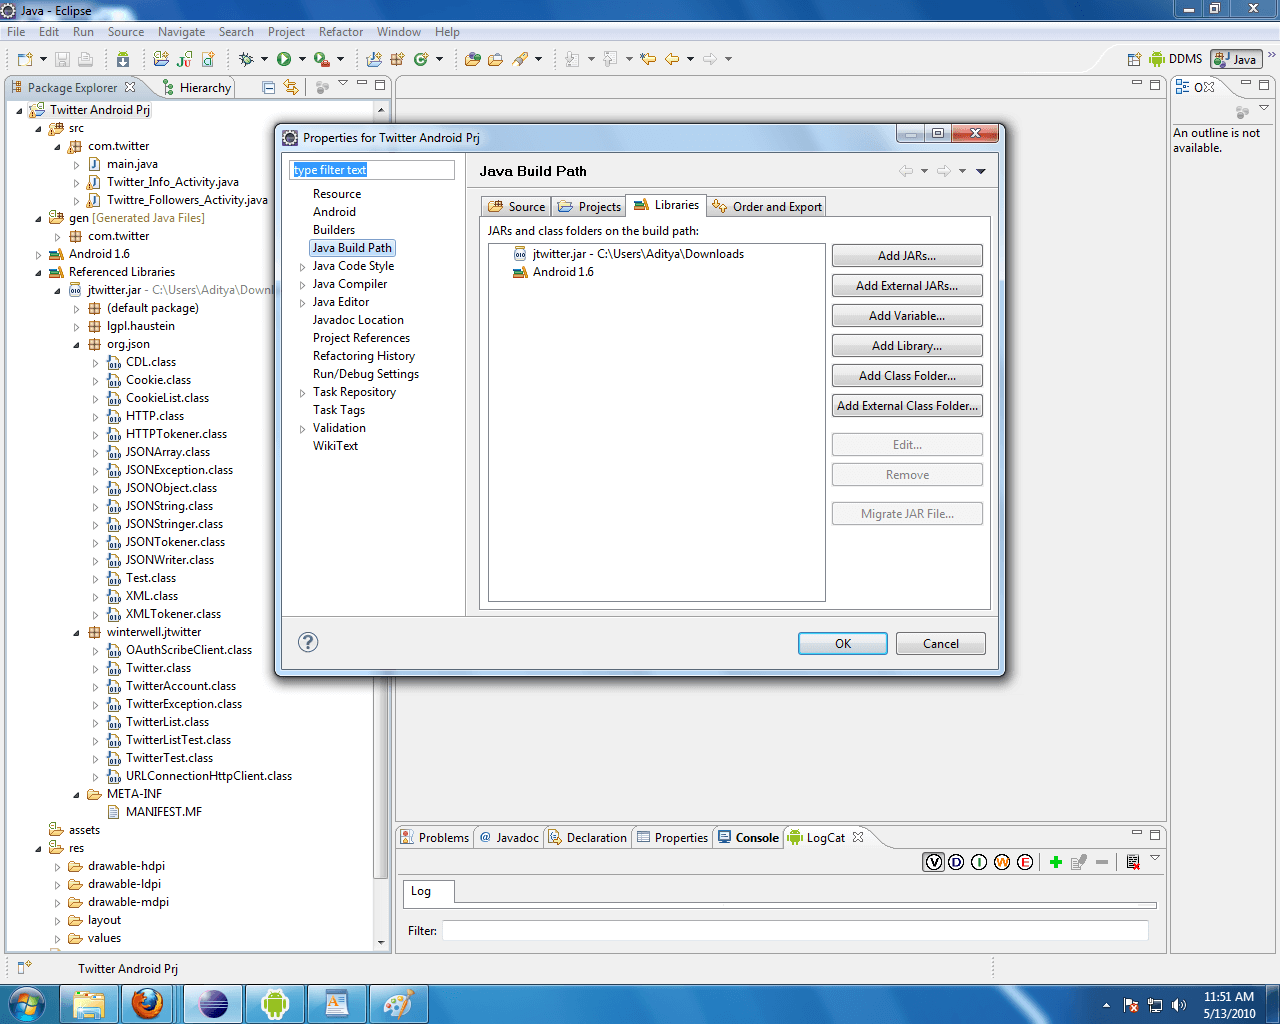
add_jar2
ImportedLib
1 | [/xml] |
<ImageView
android:layout_width="fill_parent"
android:layout_height="wrap_content"
android:src="@drawable/logo1"
android:layout_gravity="center_horizontal"
android:layout_marginLeft="0dip"
android:layout_marginTop="20dip"
/>
<!– Code For Login Name And Password –>
<FrameLayout
android:layout_width="fill_parent"
android:layout_height="wrap_content"
android:background="#fff"
android:layout_marginTop="70dip">
<TableLayout
android:layout_width="fill_parent"
android:layout_height="wrap_content"
android:layout_gravity="center_vertical"
android:gravity="center_horizontal" >
<TableRow
android:layout_width="fill_parent"
android:layout_height="wrap_content">
<TextView
android:layout_width="fill_parent"
android:layout_height="wrap_content"
android:text="User Name"
android:layout_marginLeft="40dip"
android:textColor="#000"
/>
<EditText
android:layout_width="150dip"
android:layout_height="wrap_content"
android:layout_marginLeft="40dip"
android:singleLine="true"
android:id="@+id/main_username_edit_text"
/>
</TableRow>
<TableRow
android:layout_width="fill_parent"
android:layout_height="wrap_content">
<TextView
android:layout_width="fill_parent"
android:layout_height="wrap_content"
android:text="Password"
android:layout_marginLeft="40dip"
android:textColor="#000"
/>
<EditText
android:layout_width="150dip"
android:layout_height="wrap_content"
android:layout_marginLeft="40dip"
android:password="true"
android:singleLine="true"
android:id="@+id/main_password_edit_text"
/>
</TableRow>
</TableLayout>
</FrameLayout>
<Button
android:layout_width="70dip"
android:layout_height="wrap_content"
android:text="Log In"
android:id="@+id/main_loin_button"
android:layout_marginTop="20dip"
android:layout_marginLeft="130dip"
/>
<!– Code For Login Name And Password Ends –>
</LinearLayout>
[/java]
Code Description :
Login:
01 | my_twiter = new Twitter(userName,password); |
02 | if(my_twiter == null){ |
03 | Toast.makeText(main.this, "Incorrect Login", |
04 | Toast.LENGTH_LONG).show(); |
05 | } |
06 | else { |
07 | try { |
08 | Log.v("Twitter Status :",my_twiter.getStatus()+""); |
09 | Intent intent = new Intent(main.this,Twitter_Info_Activity.class); |
10 | startActivity(intent); |
11 | }catch(Exception e){ |
12 | e.printStackTrace(); |
13 | } |
14 | } |
01 | setTitle("Tweet"); |
02 | AlertDialog.Builder inputDialog; |
03 | inputDialog = new AlertDialog.Builder(Twitter_Info_Activity.this); |
04 | inputDialog.setTitle("Enter Tweet"); |
05 | et_input = new EditText(Twitter_Info_Activity.this); |
06 | et_input.setWidth(250); |
07 | et_input.setHeight(30); |
08 | inputDialog.setView(et_input); |
09 | inputDialog.setPositiveButton("Ok", |
10 | new DialogInterface.OnClickListener() { |
11 | @Override |
12 | public void onClick(DialogInterface dialog, int which) { |
13 | // TODO Auto-generated method stub |
14 | String txt_tweet= et_input.getText().toString(); |
15 | main.my_twiter.setStatus(txt_tweet); |
16 | Toast.makeText(Twitter_Info_Activity.this, |
17 | "Tweet Successful", |
18 | Toast.LENGTH_LONG).show(); |
19 | } |
20 | }); |
21 | inputDialog.setNegativeButton("Cancle", |
22 | new DialogInterface.OnClickListener() { |
23 | @Override |
24 | public void onClick(DialogInterface dialog, int which) { |
25 | // TODO Auto-generated method stub |
26 | } |
27 | }); |
28 | inputDialog.show(); |
29 | } |
1 | setTitle("Friends"); |
2 | List<User> arr= main.my_twiter.getFriends(); |
3 | Object[] str=arr.toArray(); |
4 | String[] str1 = new String[str.length]; |
5 | for(int i=0;i<str.length;i++) { |
6 | str1[i] = str[i].toString(); |
7 | } |
8 | lst_myTwitts.setAdapter(new ArrayAdapter<String>(Twitter_Info_Activity.this, |
9 | android.R.layout.simple_list_item_1, str1)); |
01 | setTitle("Followers"); |
02 | List<User> arr= main.my_twiter.getFollowers(); |
03 | Object[] str=arr.toArray(); |
04 | String[] str1 = new String[str.length]; |
05 | if(str1.length == 0) { |
06 | Toast.makeText(Twitter_Info_Activity.this, "No Followers", |
07 | Toast.LENGTH_LONG).show(); |
08 | } |
09 | for(int i=0;i<str.length;i++) { |
10 | str1[i] = str[i].toString(); |
11 | } |
12 | lst_myTwitts.setAdapter(new ArrayAdapter<String> |
13 | (Twitter_Info_Activity.this, |
14 | android.R.layout.simple_list_item_1, str1)); |
01 | setTitle("Favorites"); |
02 | List<Status> arr= main.my_twiter.getFavorites(); |
03 | Object[] str=arr.toArray(); |
04 | String[] str1 = new String[str.length]; |
05 | if(str1.length == 0) { |
06 | Toast.makeText(Twitter_Info_Activity.this, |
07 | "No Favorites", Toast.LENGTH_LONG).show(); |
08 | } |
09 | for(int i=0;i<str.length;i++) { |
10 | str1[i] = str[i].toString(); |
11 | } |
12 | lst_myTwitts.setAdapter(new ArrayAdapter<String>(Twitter_Info_Activity.this, |
13 | android.R.layout.simple_list_item_1, str1)); |
Simulator will look like as follows
1) Login Screen : enter your twitter user name and password
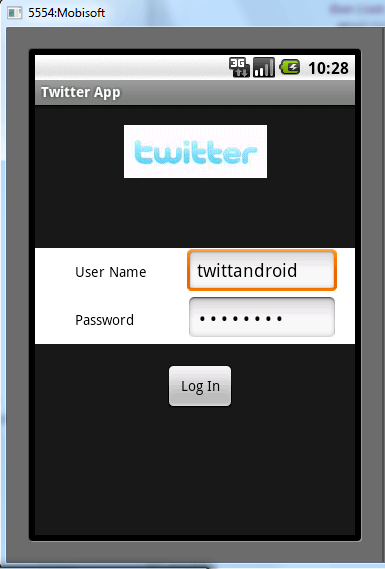
LoginScreen

FriendsList
TweetClick
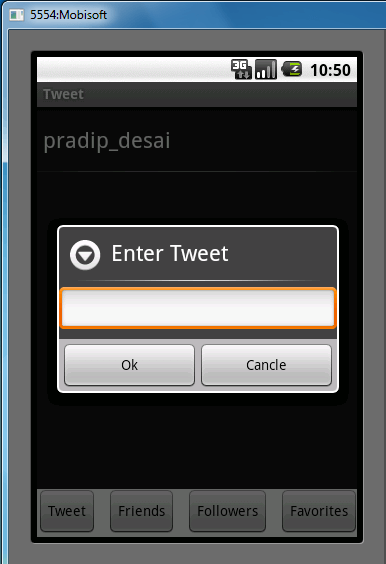
TweetDialog
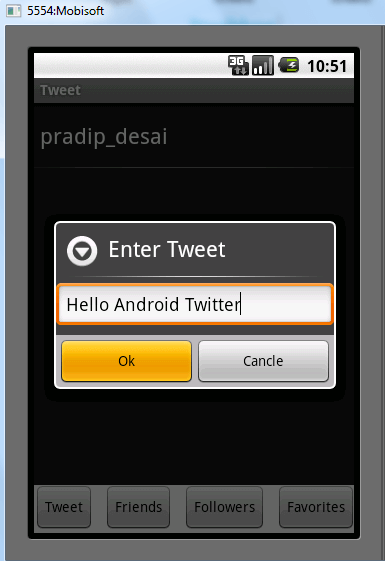
TweetMessage
SuccessfulTweet
URL:http://www.mobisoftinfotech.com/blog/category/android/